Introduction
One of the reasons openSUSE is my preferred distribution is because of the flexibility, power, and intuitiveness of its package and repository management system. It offers the zypper command line tool which is analogous to the apt tool in Debian based distributions, yum in Fedora and Red Hat based distributions, and the urpm tools in Mandriva based distributions, but it is not split into different programs like apt-get, and apt-cache as in Debian based distributions and urpmi, urpmi.update, and urpme in the Mandriva based distros. It is invoked with zypper and an intuitively named argument to zypper. (Debian users of course could use the recommended tool aptitude.)
It also offers a graphical package management tool in the form of the YaST's "Software Management". Like all of the YaST modules, it is available in GTK, Qt, and ncurses versions. The graphical versions have major interface differences that might prompt some users to specify the preferred YaST version in the/etc/sysconfigYaST module that does not correspond to the toolkit of their desktop.
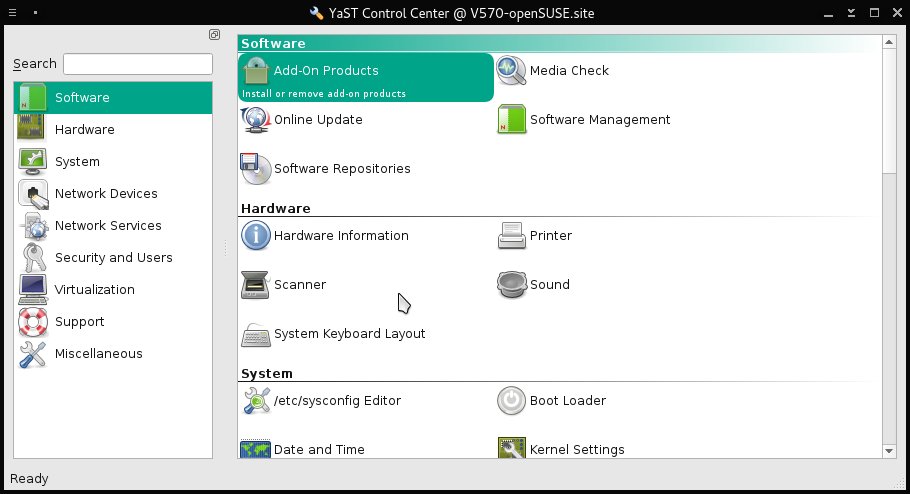
YaST Main Window.
The Software related modules of YaST are at the top of the window. The "Software Repositories" module can also be accessed from within the "Software Management" Module through a menu.
Some of the other software related YaST modules are accessible from within the "Software Management" module or directly from the main YaST window.
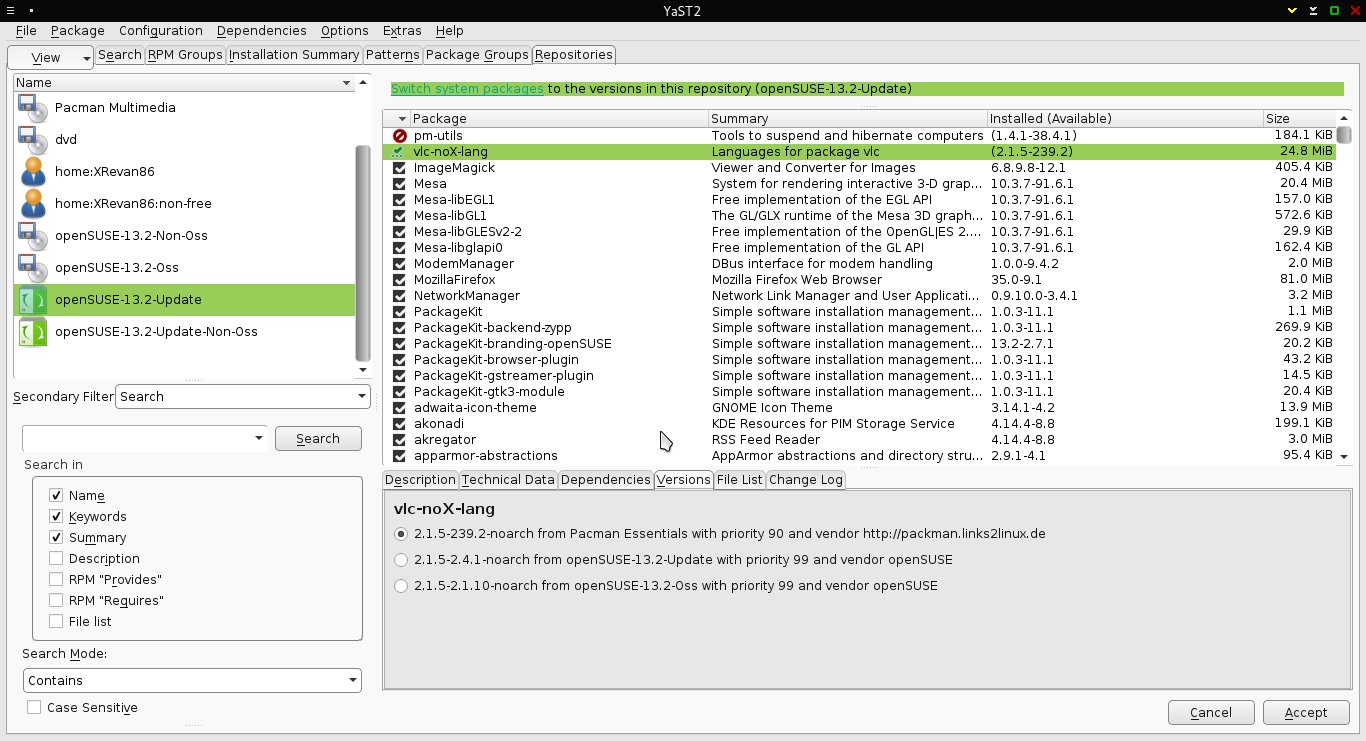
The YaST "Software Management" module.
In this window it is showing packages filetered by reposiory.
The "Software Repositories" and "Online Update" modules are accessible from the Qt version of the interface from the Configuration menu.
Structure of openSUSE Repositories
Default Repositories Added at Installation
An openSUSE installation adds four repositories by default, each one specific to the release version. These are the Open Source Software (OSS), the OSS Updates, Non-OSS, and Non-OSS updates. The URL's are
- Release Repository - Open Source Software
- http://download.opensuse.org/distribution/13.2/repo/oss/
- Release Repository - Non Open Source Software
- http://download.opensuse.org/distribution/13.2/repo/non-oss/
- Update Repository - Open Source Software
- http://download.opensuse.org/update/13.2/oss/
- Update Repository - Non Open Source Software
- http://download.opensuse.org/update/13.2/non-oss/
Repository URL Naming Scheme
The official repository URLs begin with the base URL
http://download.opensuse.org/
Packages from the initial version release then add
distribution/13.2/repo
then
/oss
for OSS packages or
non-oss
for non-OSS packages. Packages that update the initial version release add
updates/13.2/
to the base URL instead of
distribution/13.2/repo
then
/oss
for OSS packages or
non-oss
for non-OSS packages. The "13.2" in the above can be replaced with the actual version.
This page on the openSUSE wiki lists all of the official repositories.
Besides the URI, the most important details to know when adding repositories manually are that the repositories have a name and an alias which can be specified by the user. When adding repositories through some automated proces, for example, as part of a 1-Click install, the name and alias will be defined by the process as created by the packager, although they can be customized during or after the process. The methods of specifying these properties when adding a repository or afterwards are shown below.
Repository Management
Basic Repository Management with YaST
The following screenshot of the primary YaST "Software Repositories" module screen shows the repositories added to the system; it shows the properties of the repositories, including their URIs, their names, and priority, among their other properties.
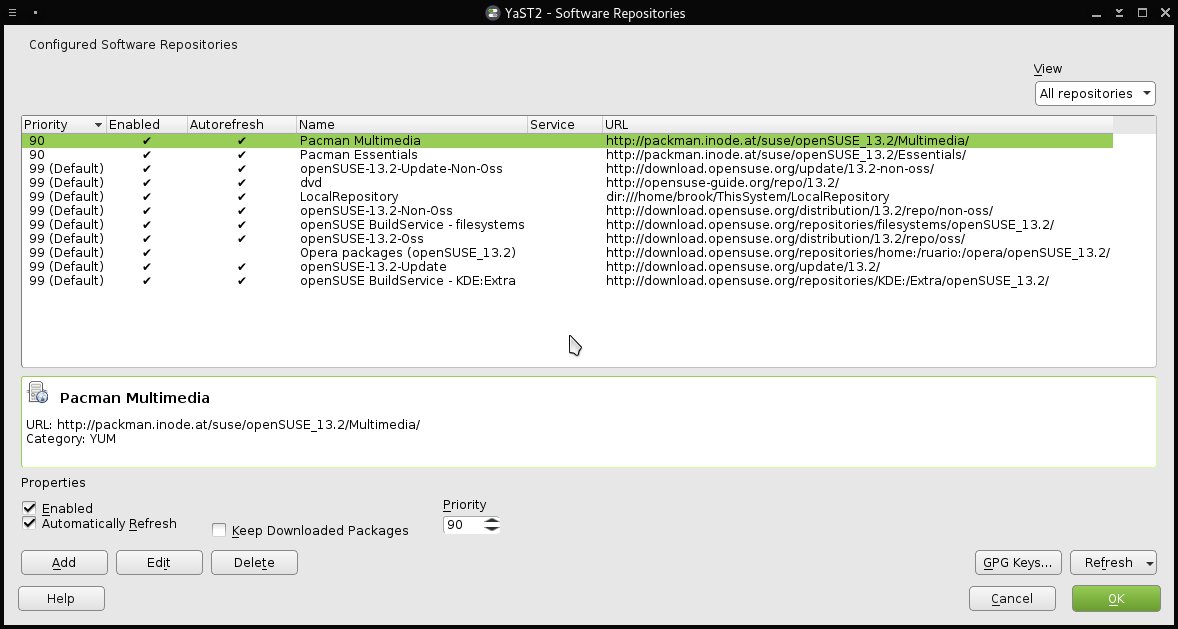
YaST "Software Repositories" Module.
The primary screen of this module shows the properties of the repositories added to the system, including their URIs, user defined names, and priority, among other repository properties.
Clicking the edit button in the bottom pane after a repository has been hilighted shows displays the dialog in the following screenshot.
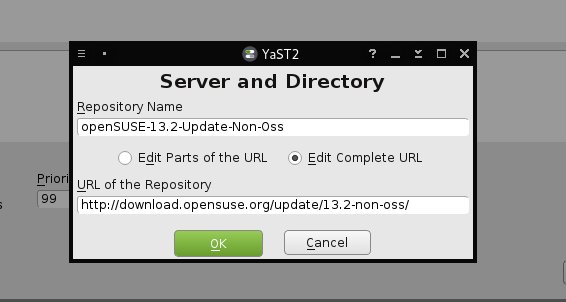
Repository URL and Name Editing Dialog Box of YaST Repository Management Module
This dialog box is opened by clicking the "Edit" button in the main "Software Repositories" screen.
where the URL or the name can be changed. As far as I know the alias, which isn't shown in these screenshots, can only be changed withzypper.
Other actions can be performed on repositories through the "Software Repositories" module, which is to modify the properties indicated in the column headings in the table displayed by the module. These properties are:
- Priority
- Packages from repositories set with a lower priority number will be preferred over the same packages from repositories with a higher priority number.
- The default priority number set when adding a repository is 99.
- In the screenshot of "Software Repositories" I have set the PackMan repositories with a lower priority than any other repository to ensure that packages that are also available from other repositories will be installed from this repository for reasons given below.
- Highlighting a repository in the list and changing the value in the "Priority" drop-down in the bottom half of the screen will modify the Priority setting.
- Enabled
- This is obvious
- Autorefresh
- Enabling autorefresh will automatically update the local package cache to the remote version first whenever package management actions are performed.
- Disabling autorefresh will save a few seconds during a package management task.
- The database can be refreshed manually using the drop-down button in the lower right of the screen. It can also be refreshed using a zypper action.
- Name
- This is the alias of the repository. It can be changed by clicking the "Edit" button.
- Service
- A service is group of repositories like a repository is a group of packages.
- URL
- The URL of the repository. It can be changed by clicking the "Edit" button.
Adding Repositories with YaST "Software Management" Module
Clicking the "Add" button on the main screen of the "Software Repositories" YaST module will open the following window, allowing the user to choose the method of specifying the repository to be added.
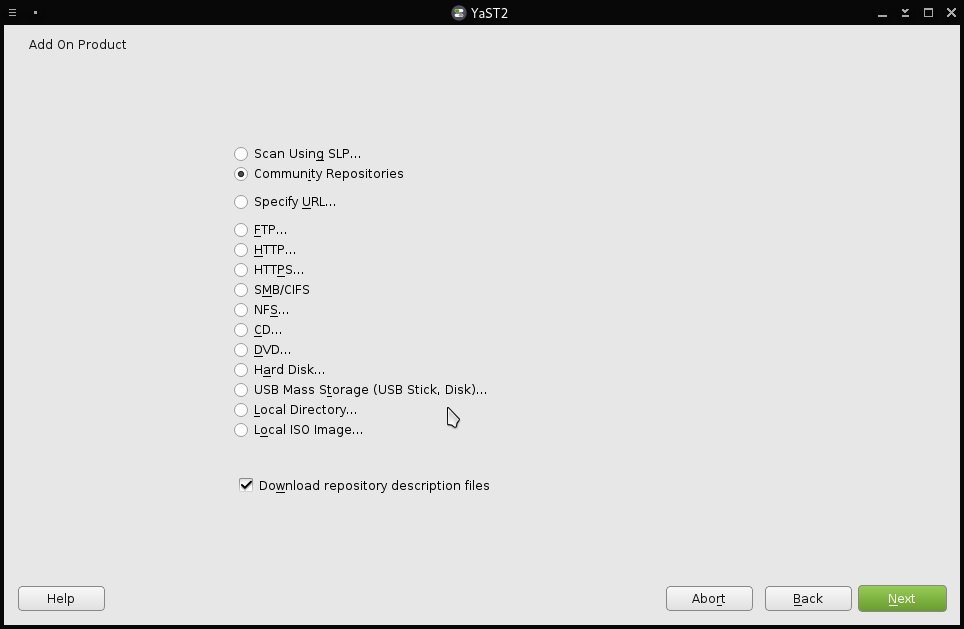
First Dialog Box when "Add" Is Selected in the YaST "Software Repositories" Module
The transfer protocol type or medium of the repositories can be specified or you can choose to enter the URL of the repository directly. For Community Repositories the appropriate radio button can be selected. This screen has been changed sometime between Feb 15 2015 and March 25 2015, maybe as part of updating to Plasma 5. The new version is below.
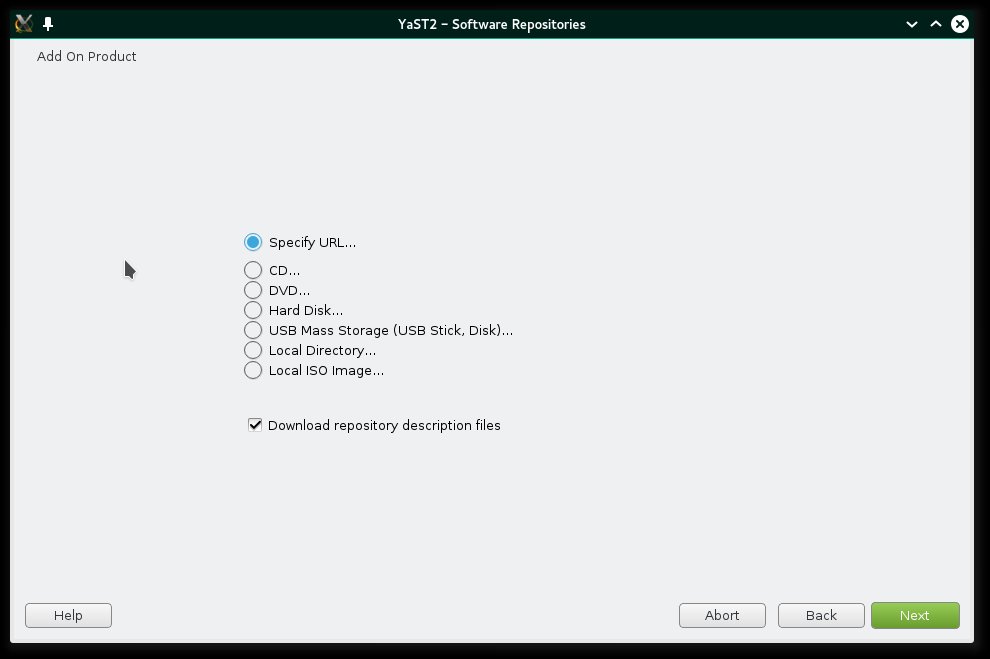
First Dialog Shown After Selecting "Add" in the "Software Repositories" YaST Module
This is the current version of the screen in the above screenshot changed sometime between Feb 15 2015 and March 25 2015, maybe as part of updating to Plasma 5.
Some of the choices of method are described here.
- Community Repositories
- Selecting this option will display a list of available community, user, or upstream organization repositories hosted on the openSUSE Build Service. The list displayed here is not the complete set of such repositories that are available. When a repository is added from this list it will not appear here when visiting it again. The second screenshot below shows the list.
- Specify URL
- This is the most direct and probably the most used of the options and can be used when the remote URL is known.
- Specify protocol (FTP, HTTP, HTTPS, SMB/CIFS, NFS
- These options were removed from this screen between the time this article was started and today. The new version of this screen in YaST is shown below after the older version. This seems like a good change as the protocol can be specified in the "Specify URL" option, making these options redundant.
- Specify physical location (CD, DVD, Hard Disk, USB Drive)
- This option allows adding collections of rpm and srpm packages stored on local physical media.
- Specify Local directory or iso image
- This option allows addinf collections of rpm and srpm packages stored on the local file system. This option is useful if you have built your own packages and collect them in a directory on your system.
If "Community Repositories" is selected in the previous screen the following dialog will be shown:
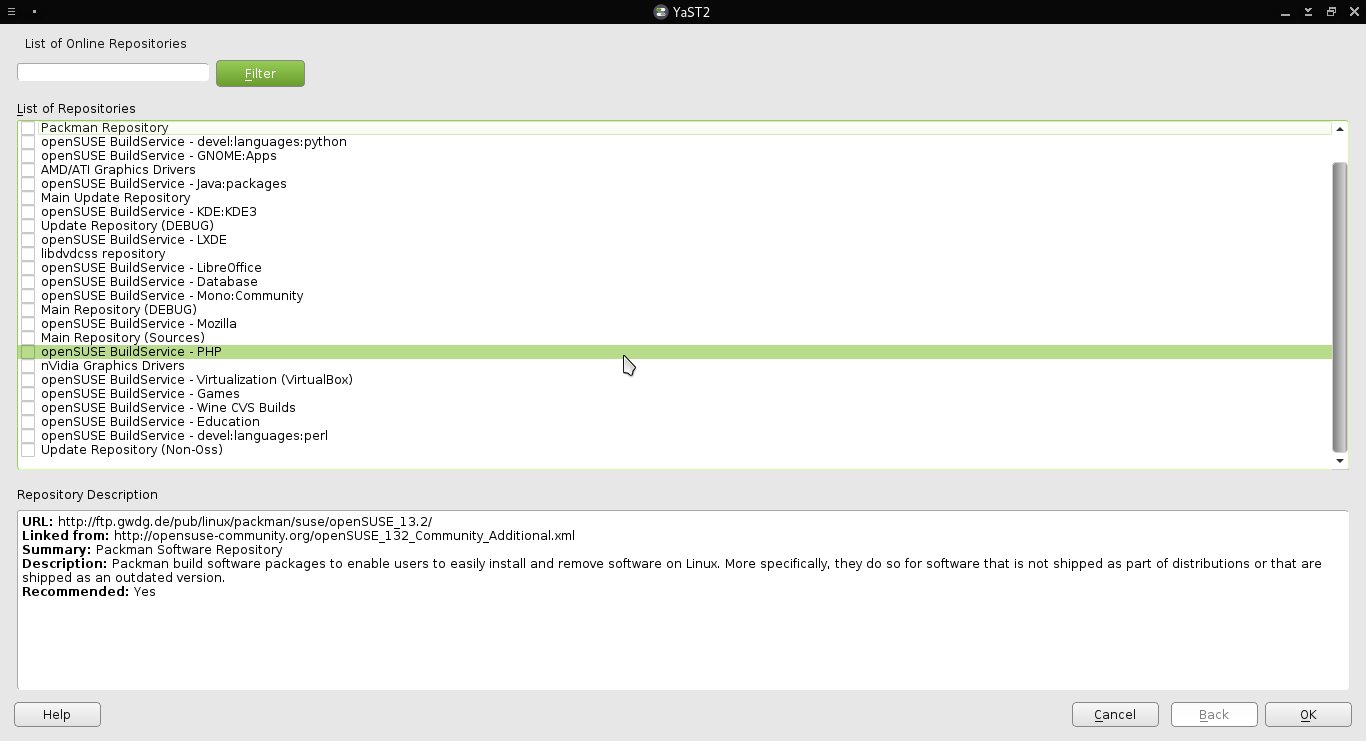
Community Repositories Selection Dialog
Some useful packages, such as additional KDE plasmoids, are available from repositories that can be enabled from here.
which shows available community repositories. Some of these are official openSUSE repositories hosted on http://download.opensuse.org/ others are repositories on the openSUSE build service and third-party repositories. Useful repositories that would appear this list (they don't appeat in the screenshot above because I had already added them) are the KDE repository which gives access to additional KDE features like plasmoids that are not in the default repositories and newer packages, the filesystem repository.
Managing GPG Keys
GPG Keys can be managed by first clicking the "GPG Keys" button which will open the following dialog:
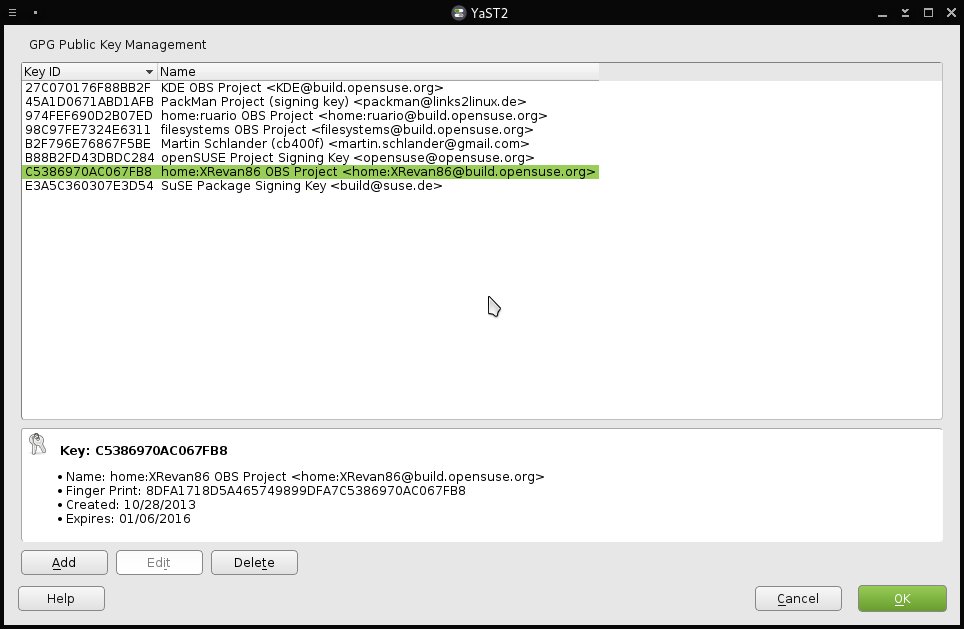
Repository GPG Key Management
GPG Keys associated repository can be managed here.
Removing a repository does not remove the associated keys, so this tool can be used after removing a repository.
The YaST "Software Repositories" module can do almost everything that may need to be done to manage repositories. What it can do may be easier done using it than zypper in a terminal, which can do everything. But there is a choice.
Basic Repository Management with zypper
zypper can not only perform the same functions of the YaST "Software Repositories" module, but can do more. The generic zypper command, reproduced from the output of
zypper help
is
zypper [--global-options] {command} [--command-options] [arguments] Repository related
zypper commands are as follows. Note that many
zypper commands have abbreviations, as in
ar for
addrepo.
Repository Management:
	repos, lr               List all defined repositories.
	addrepo, ar             Add a new repository.
	removerepo, rr          Remove specified repository.
	renamerepo, nr          Rename specified repository.
	modifyrepo, mr          Modify specified repository.
	refresh, ref            Refresh all repositories.
	clean                   Clean local caches.
and the options that can be used with these commands are:
Repository Options:
	--no-gpg-checks         Ignore GPG check failures and continue.
	--gpg-auto-import-keys  Automatically trust and import new repository signing keys.
	--plus-repo, -p    Use an additional repository.
	--plus-content     Additionally use disabled repositories providing a specific keyword.
	Try '--plus-content debug' to enable repos indicating to provide debug packages.
	--disable-repositories  Do not read meta-data from repositories.
	--no-refresh            Do not refresh the repositories.
	--no-cd                 Ignore CD/DVD repositories.
	--no-remote             Ignore remote repositories.
	--releasever            Set the value of $releasever in all .repo files (default: distribution version)
Listing Repositories
The zypper repos or lr arguments will list the repositories added to the system, showing the repository name, alias, enabled status, and autorefresh status by default. The default settings of the repository properties that are shown is specified in the zypper.conf file.
The command is:
zypper repos
or
zypper lr
To show more than the default properties of the repositories without editingzypper.conf, options to the repo or lr can be specified to provide more information.
zypper lr -p
will show the priorities of the repositories in the output table in addition to the default properties.
zypper lr -u
will show the URLs in addition to the default properties. There are many more options -- which can be combined -- to repo or lr that can modify the output by changing what is listed, sorting what is listed by a number of criteria. One last useful option to the repo or lr argument to zypper that I will mention is the option --details as in
zypper lr --details
which will show in the output table, in addition to the default set of properties displayed by lr without any options, the service -- if the repository belongs to one, the type, and the URI of the repository.
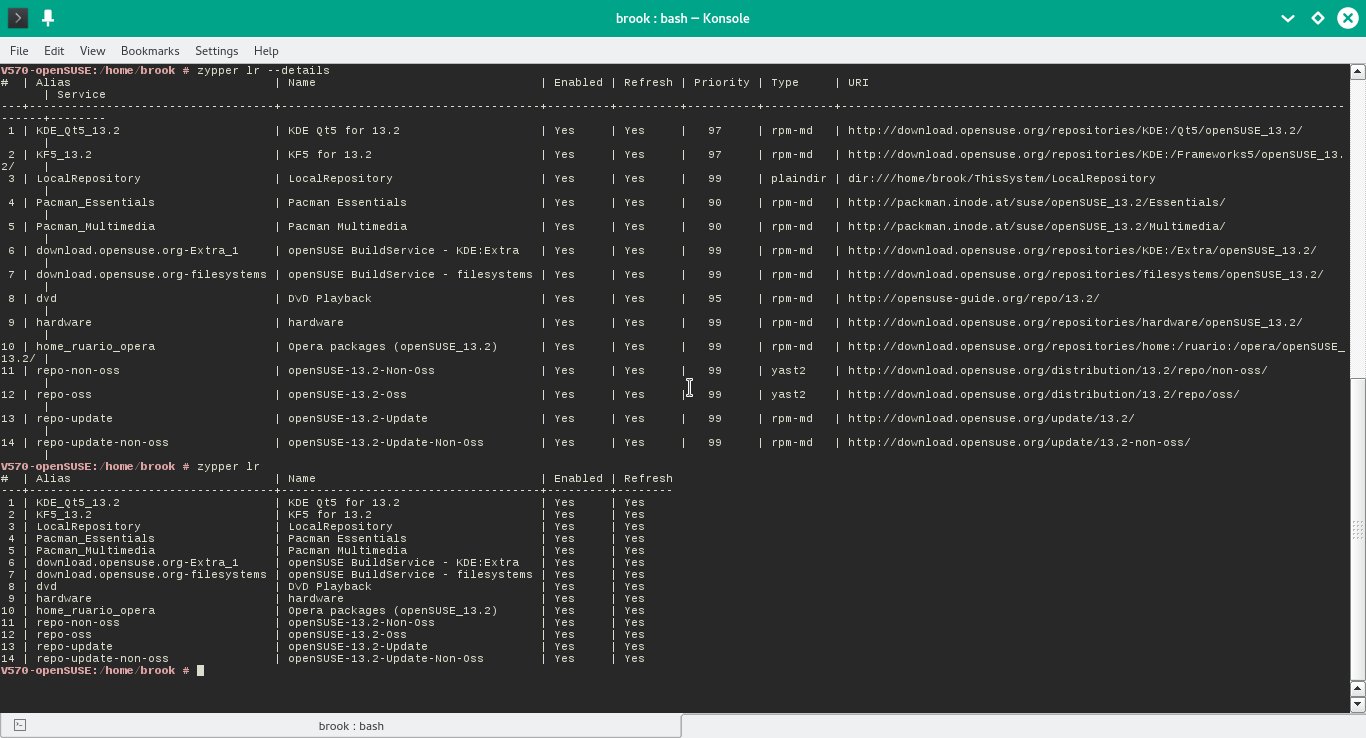
Output of zypper lr --details and zypper lr --details Commands
The --details provides the URIs, priorities, and types of the repositores
The screenshot above shows the difference in information provided with and without the
--details
option.
Adding a Repsoitory
Repositories are added with the zypper argument addrepo, or with the abbreviated form of the argument -- ar. The generic commands are: zypper addrepo [options] {URI} {alias}
or
zypper ar [options] {URI} {alias}
The most common options are --refresh -- abbreviated -f, which enabes autorefresh of the repository at the beginning of any package management action, and --name -- abbreviated -n, which allows a name for the repository to be specified; specifying a descriptive name, in quotes if there are spaces, is beneficial. For example, to add the repositores containing the latest stable Plasma 5 components for openSUSE 13.2, use:
zypper ar -f -n "KDE Qt5 for 13.2" http://download.opensuse.org/repositories/KDE:/Qt5/openSUSE_13.2/ KDE_Qt5_13.2
and
zypper ar -f -n "KF5 for 13.2" http://download.opensuse.org/repositories/KDE:/Qt5/openSUSE_13.2/ KF5_13.2
where the string after the -n option is a name I chose for the repositories and the last term (after the URL) is the alias, also a property the user is free to specify.
Repository options such as the name of the repositry, the enabled status, and the priority of the repository can be set with the modifyrepo or mr action or argument to zypper. The output of
zypper mr --help
is below:
	V570-openSUSE:~ # zypper mr --help
	modifyrepo (mr) {options} {alias|#|URI} ...
	modifyrepo (mr) {options} {--all|--remote|--local|--medium-type}

	Modify properties of repositories specified by alias, number, or URI, or by the
	'--all, --remote, --local, --medium-type' aggregate options.

	Command options:
	-d, --disable             Disable the repository (but don't remove it).
	-e, --enable              Enable a disabled repository.
	-r, --refresh             Enable auto-refresh of the repository.
	-R, --no-refresh          Disable auto-refresh of the repository.
	-n, --name                Set a descriptive name for the repository.
	-p, --priority   Set priority of the repository.
	-k, --keep-packages       Enable RPM files caching.
	-K, --no-keep-packages    Disable RPM files caching.
	-g, --gpgcheck            Enable GPG check for this repository.
	-G, --no-gpgcheck         Disable GPG check for this repository.

	-a, --all                 Apply changes to all repositories.
	-l, --local               Apply changes to all local repositories.
	-t, --remote              Apply changes to all remote repositories.
	-m, --medium-type   Apply changes to repositories of specified type.
Editing a Repository Name
I haven't found the method of changing the alias of an already added repository, but the name can be changed with zypper's modifyrepo or mr action or argument using the --name or -n option as in:
zypper mr -n "DVD Playback" dvd
which responds with
Name of repository 'dvd' has been set to 'DVD Playback'.
With this command the alias stays the same but the descriptive name is changed.
Editing a Repository Priority
The priority of an existing repository can be changed using the same command but with the --priority or -p option as in:
zypper mr -p 95 "DVD Playback"
which will output
Repository 'dvd' priority has been set to 95.
using the alias instead of the name, as in the command, to refer to the repository.
Repository Prioritization, Package Verision Selection, and System Package Repositories
As mentioned above, the repositories can be prioritized through the "Software Repositories" YaST module or withzypper. The importance of this capability, however, was not mentioned, which is that it allows multiple repositories that contain the same package to be enabled while ensuring that packages will be installed from a preferred repository, or the one with the lowest priority number. This is necessary, for example, if the PackMan repositories, which contain many of the same packages as the default repositories are enabled, but package versions found in PackMan are preferred over those in the default repositories as they have support for proprietary multimedia codecs.
In my openSUSE installation I have set the priority of the PackMan repositories to to 90, which will prioritize packages from this repository over the packages in the default repositories which have a default priority of 99.
One thing to note is that packages from a repository with the same priority as the default repositories may not be updated even if the optional repository has newer versions. I say may because, in my case I have added two repositories and left the priorities at the default values, but packages from one of these repositories are updated but packages from the other are not. The updated repository is the KDE Extras and the non-updated one is the OBS Hardware repository. It may be that the hardware, because of the nature of the packages has some lock that KDE Extras does not. The PackMan repositories are updated, I assume because of the lower priority number (higher priority) than the default repositories. This will require reading the relevant sections of the openSUSE Start-Up book.
One of the attractive features of openSUSE is that it is much easier to prioritize repositories -- whether through YaST orzypperthan in Debian based distributions where "apt pinning" is a much more complicated process that requires editing apt configuration files.
Package Version Selection
Besides using prioritization, which should be used, a specific package version can be selected for installation or update from the "Version" tab of the YaST "Software Management" module.
The following screenshot shows the YaST "Software Management" module with the results of a search for "vlc" displayed. The bottom half of the module's screen shows the "Versions" tab selected indicating that thevlc-codecspackage is installed from the PackMan repository.
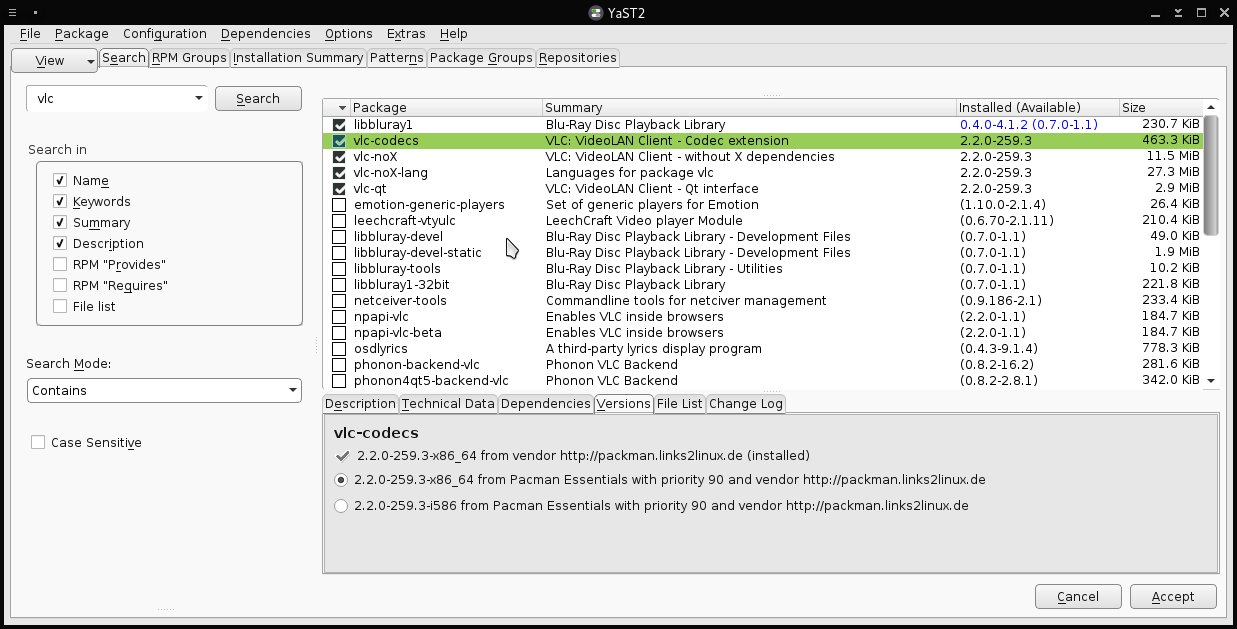
YaST Software Management Module Showing Source ofvlc-codecsPackage
The Versions tab will show available package versions from all repositories and indicate the installed version. In this case, there is only one repository that has the vlc-codecs.
To avoid complications in dependencies it is best to install the VLC Media Player program from the same repository. The following screenshot presents the
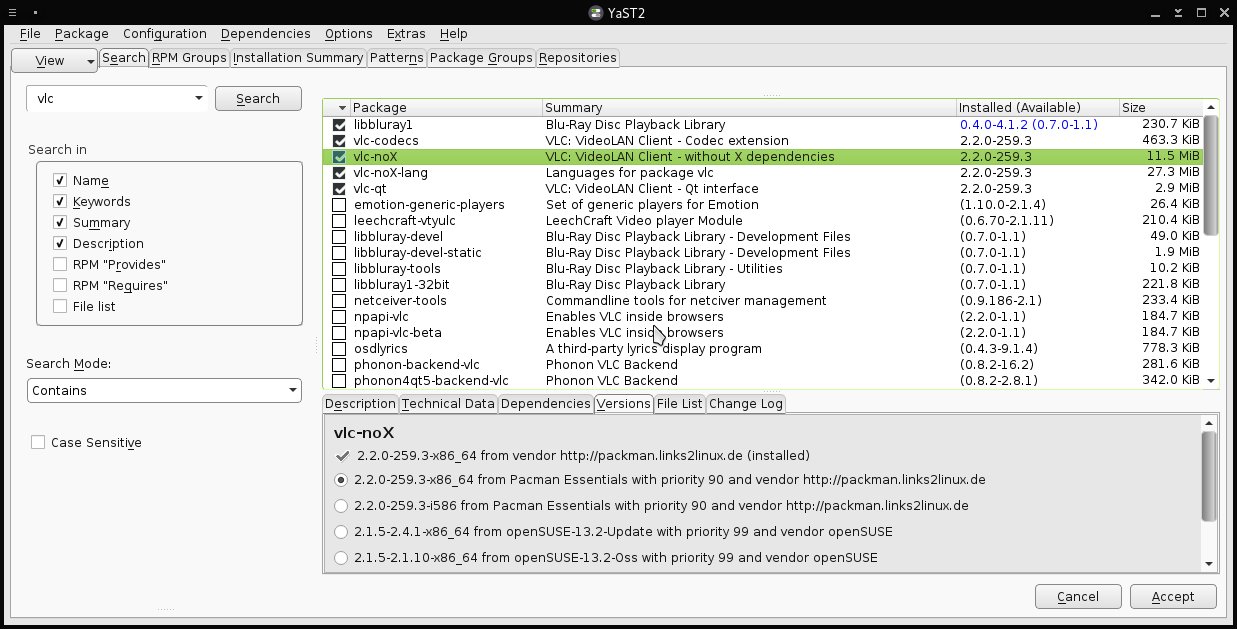
YaST Software Management Module Showing Source ofvlc-noXPackage
The Versions tab will show available package versions from all repositories and indicate the installed version. In this case, thevlc-noXpackage is available from the PackMan and the default openSUSE repositores.
"Software Management" YaST module with the "Versions" tab showing that thevlc-noXpackage is available from the openSUSE repositories as well as the PackMan repository. The check mark and the "(installed)" indicate the currently installed version. The version to be installed or the version to be installed instead of the currently installed version can be selected by activating the appropriate radio button.
Software Portal, 1-Click Install, and openSUSE Build Service
These three interrelated openSUSE software management innovations should be described breifly before descriptions and examples of their use.
- openSUSE software portal
- this is a tool at software.opensuse.org that will search for software and packages from all available openSUSE repositories, including unofficial, user maintained ones hosted by openSUSE as part of the openSUSE Build Service.
- YaST 1-Click Install
- 1-Click Install is the installation method that is initiated by activating a link to a file with an extension .ymp. This type of file is associated with the YaST software management tools on openSUSE.
- openSUSE Build Service
- the openSUSE Build Service is a service hosted by openSUSE or Novell similar to git where users can build and host packages for openSUSE and even other distributions. It is also called the Open Build Service.
Software Portal
openSUSE doesn't have a software store like Ubuntu, but it does have a software portal, which when considering that it allows access to non-official repositories from the openSUSE Build Service, it may be more beneficial than a pretty software store. When visiting this URL with an openSUSE patched version of Firefox you are redirected to a URL specific to your release version and language. This build of Firefox also includes the software portal search as one of the pre-configured search providers.
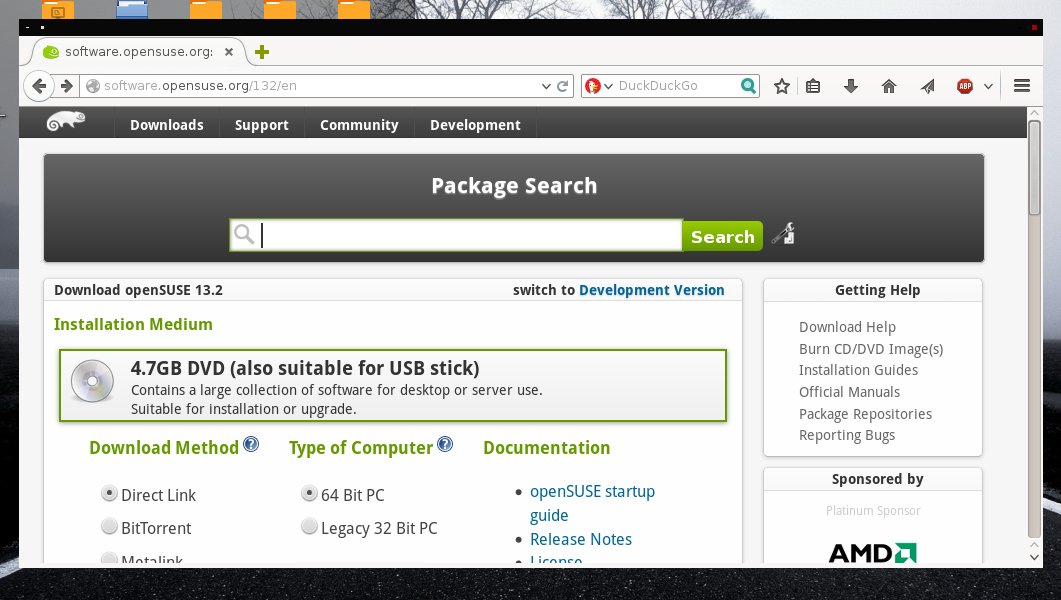
openSUSE software portal
The software portal allows you to search for any software available for openSUSE including OBS repositories.
A search for opera shows results as in the following screenshot:
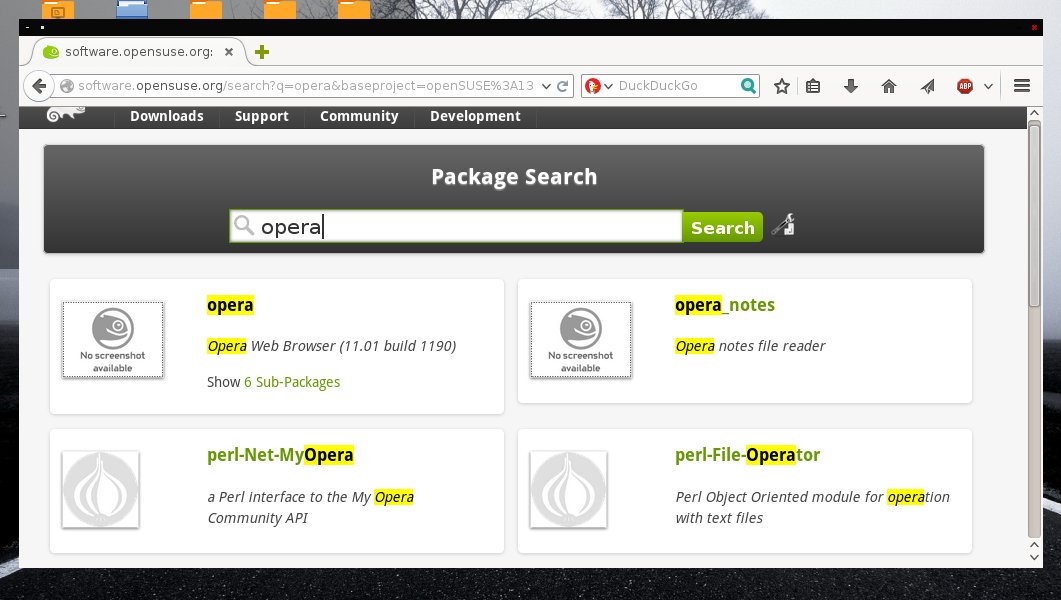
openSUSE software portal
Results displayed from a search of the software posrtal.
Selecting the desired software will show all available package versions grouped openSUSE regular release, rolling, or extended support version. If using the openSUSE patched version of Firefox, the group corresponding to the version of openSUSE being used will be expanded and official versions of the desired package will be shown. Unofficial versions will only appear after clicking the openSUSE version, then selecting "Show unstable packages" link.
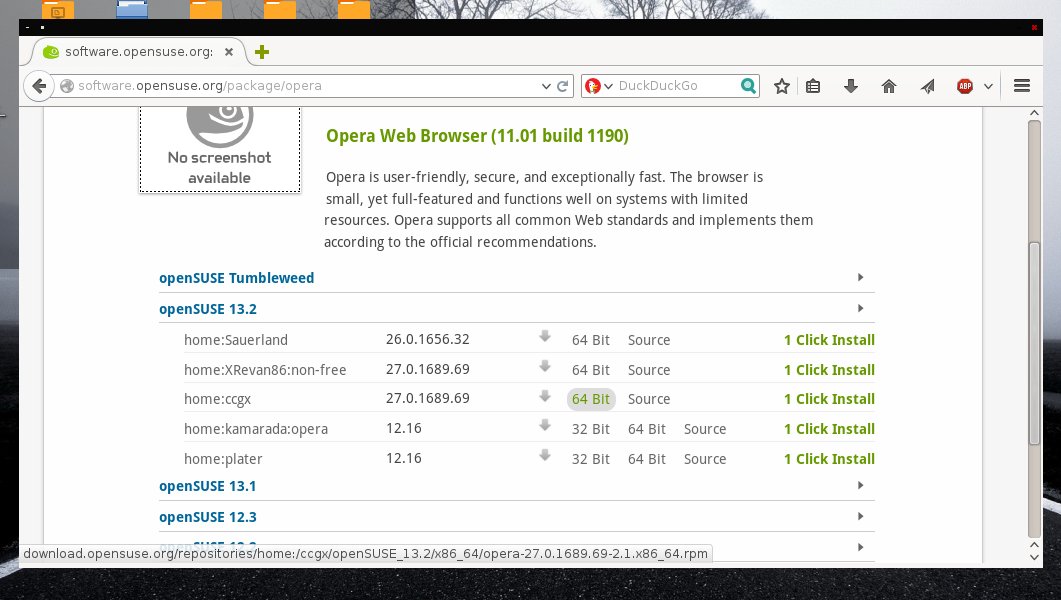
openSUSE software portal
Selecting one of the returned results will show available versions grouped by openSUSE regular release, rolling, or extended support version.
Clicking the 1-CLick install button will initiate the 1-CLick install process and the Firefox dialog asking whether to run or save the file. The file is a .ymp file that is associated with the YaST "Software Management" module.
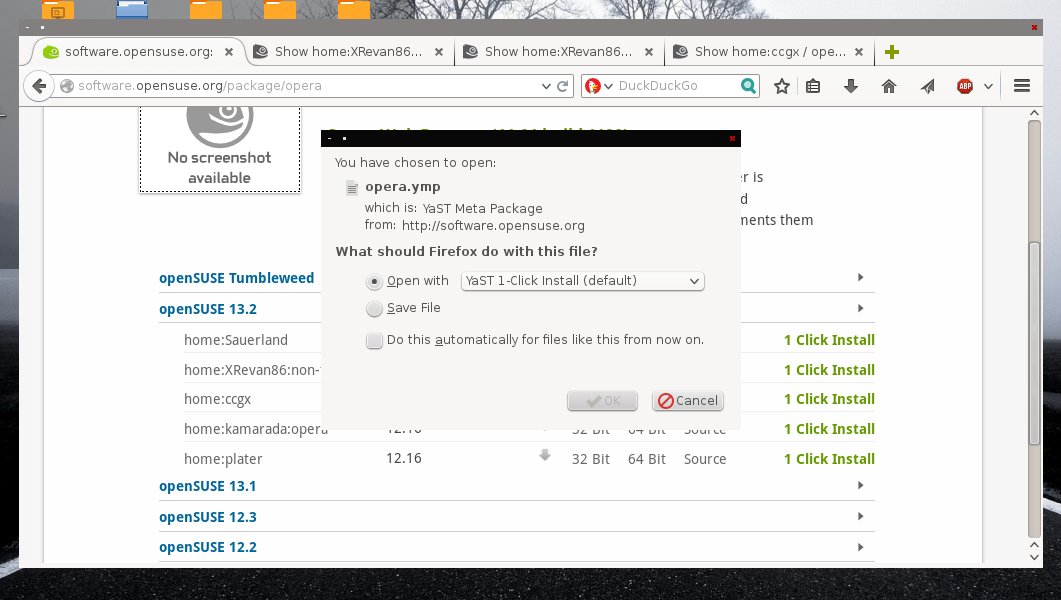
openSUSE software portal
Clicking "1-Click Install" will initiate the installation process for the corresponding package version.
The process continues to add the necessary repositories to perform the installation. The "Remain subscribed to these repositories after installation" box is is preselected by default.
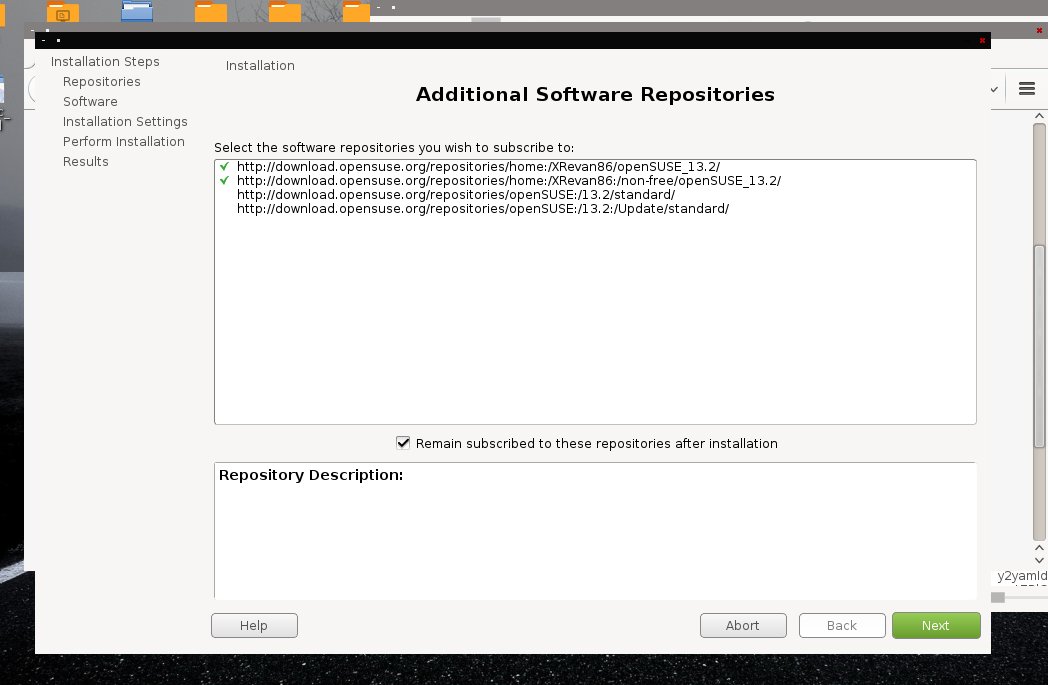
openSUSE software portal
The 1-Click Install will add the appropriate non-default repositories for the selected package version. To unsubscribe from the repositories after installation, uncheck the "Remain sbscribed ..." box.
The next page is the confirmation:
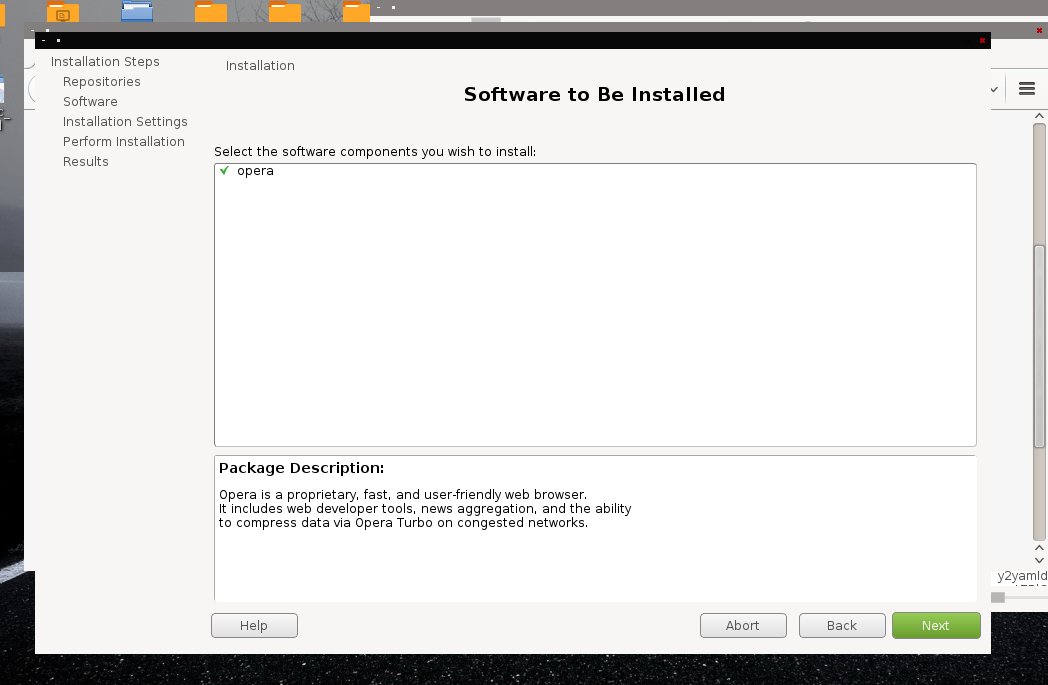
openSUSE software portal
The 1-Click Install process will show a summary of the installation.
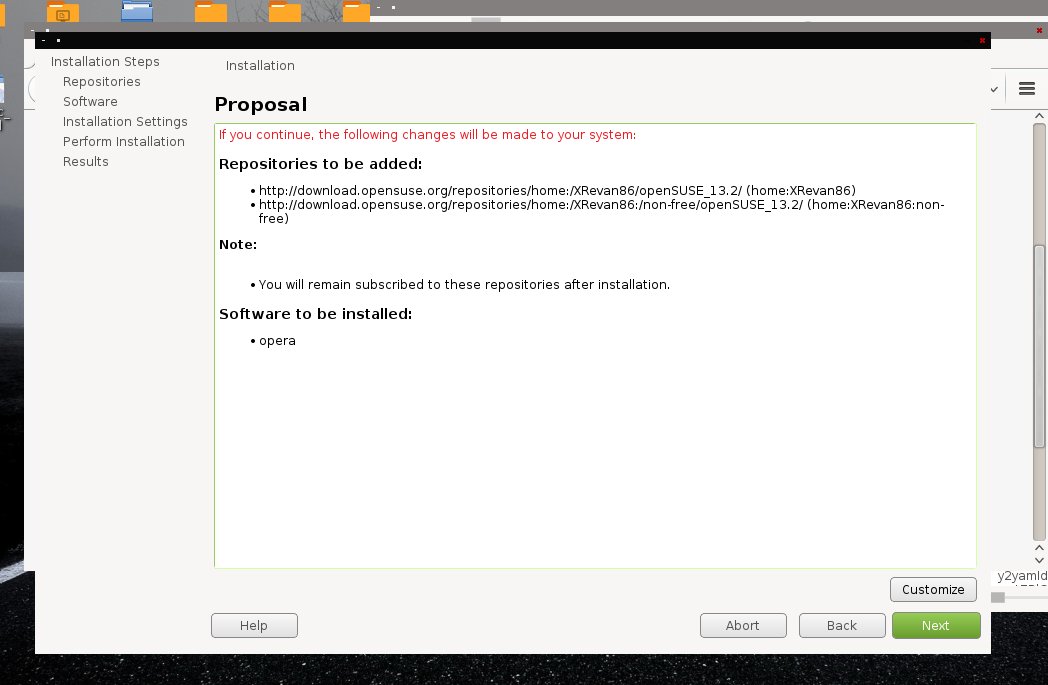
openSUSE software portal
The 1-Click Install process will ask for a confirmation.
The last screen is the summary of the 1-Click installation and serves as a confirmation to proceed with the installation.
YaST 1-Click Install
The 1-Click installation method is one of openSUSE's software management innovations; it allows the user to easily install software by simply clicking a link on a website, as shown above, not only from the openSUSE software portal, but also from any third party which supports the method. The 1-Click installation method begins by clicking a link to a on a website. The link points to a.ymlfile associated with the YaST "Software Management" module and is and xml file containing the package metadata of the software to be installed and the URLs of repositories to be addied during the installation. The file indicates the information that is to be displayed in the dialog screens that are shown to the user during the installation. The specification of the.ymlfile is at this openSUSE wiki page.
The installation continues after the initial click through a prompt asking whether to open or save the.ympfile, opening YaST if open is chosen or when eventually opened is save is chosen, adding the necessary repositories, and installing the software.
The Video Lan project is one of the third-party websites that offers a 1-CLick Install button. Some of the screens displayed during the installation of Video Lan using this method are presented below.
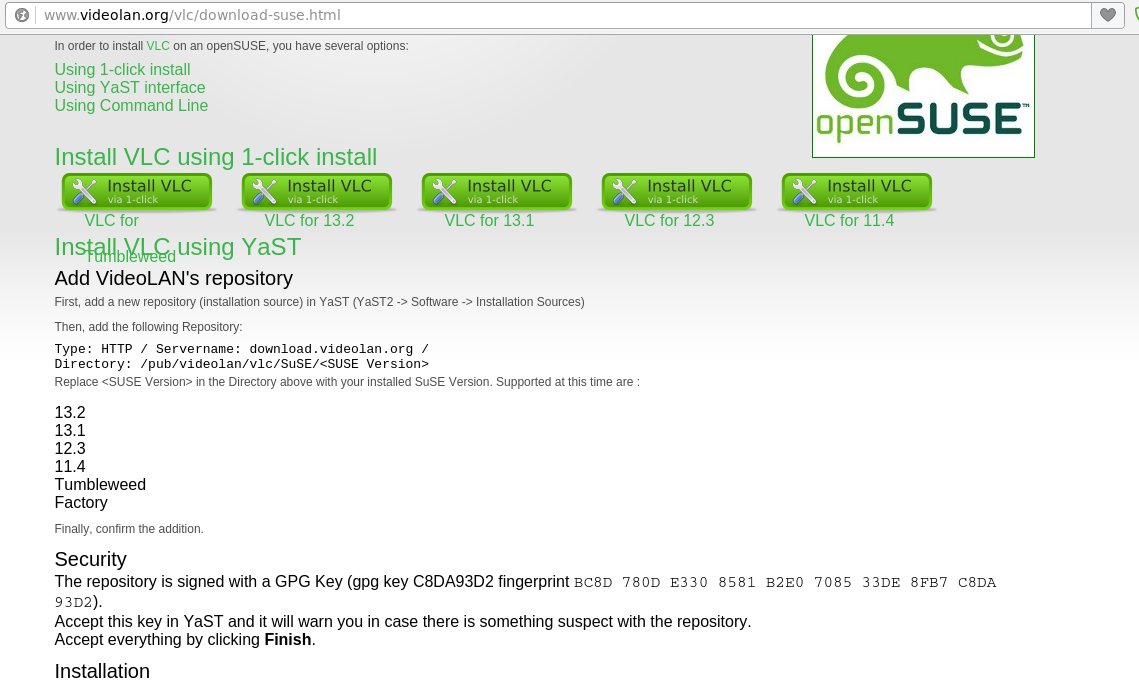
The Video LAN VLC Media Player download page for openSUSE.
Video LAN provides a 1-Click installation of its software. Using this method will add Video LAN's own repositories to the system unless the apprpriate check-box is deselected.
The screenshot above shows the Video Lan download page for openSUSE with 1-CLick Install links. The process after activating these links is the same as the 1-Click Install from the openSUSE software portal, with the exception of the format of the information presented in the dialog screens that are displayed as this depends on the choices made by the distributors of the package when creating the.ympfile. In general the first screen will have a description of the software to be installed and the last screen will act as a confirmation while summarizing the packages to be installed and the repositories to be added to the system.
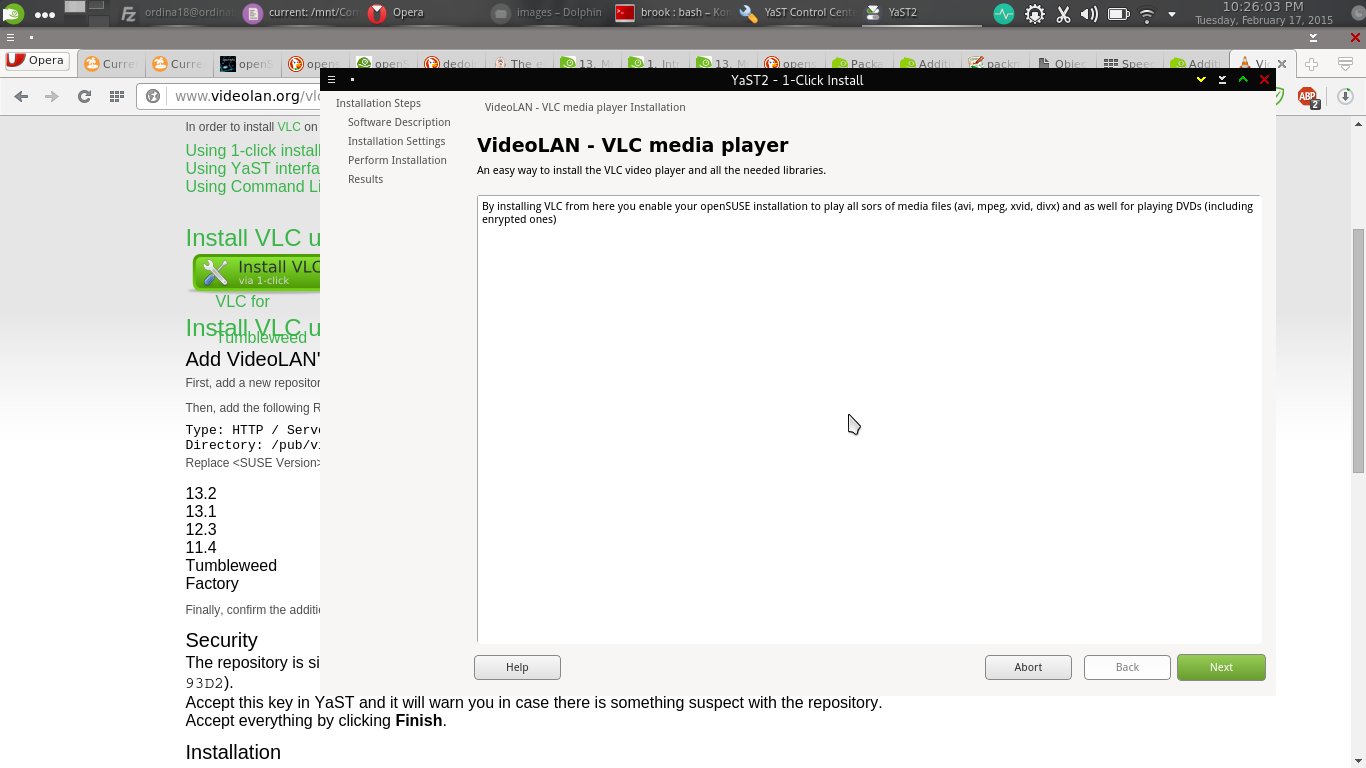
1-Click Install started from a third party link.
There will be a screen providing a description of the software to be installed. The format and information displayed depends on what the distributors of the 1-CLick installation place in the.ympfile.
The last screen will summarize the installation listing the repositories to be added and packages to be installed. There is an opportunity to customize the action by clicking the "Customize" button on this screen.
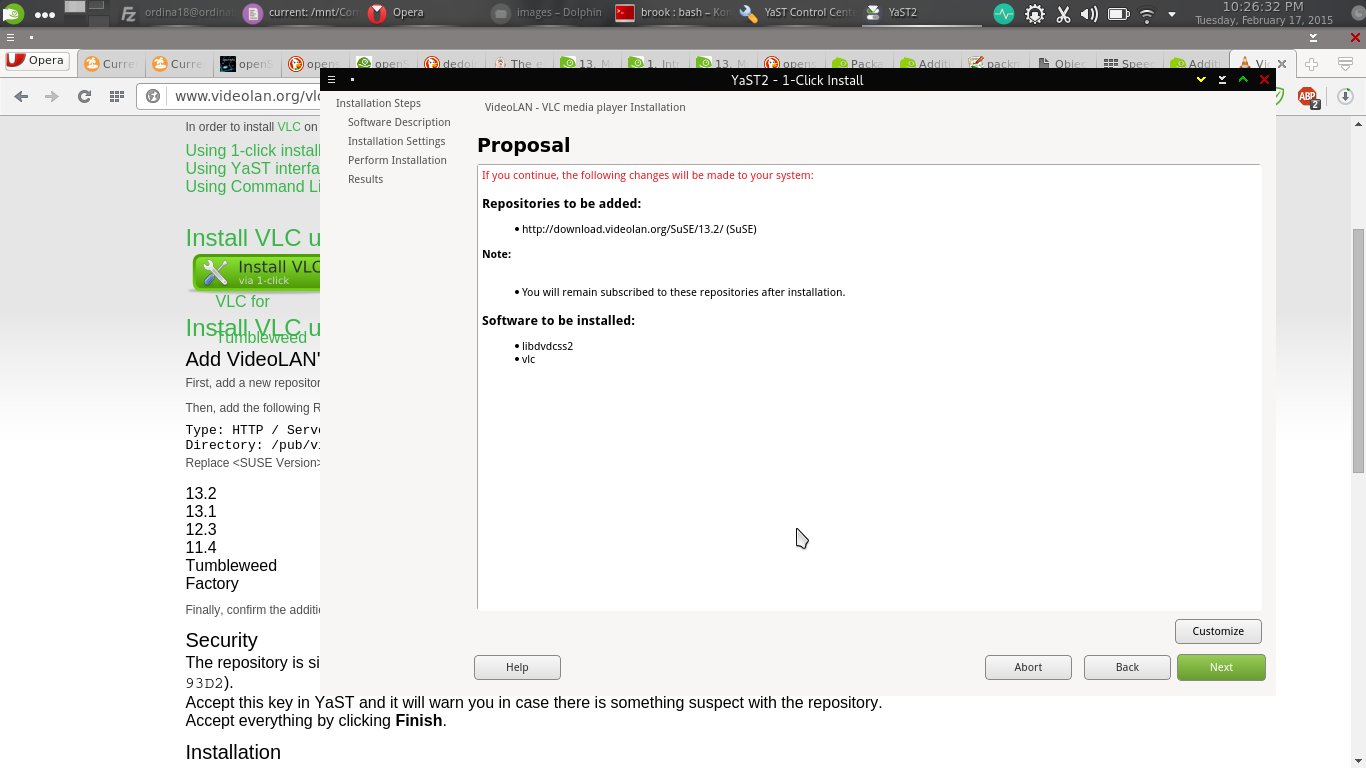
Pre 1-Click Installation Summary
Thre will be a summary listing repositories to be added and packages to be installed. There is an opportunity to customize the name of the repository and the URL by clicking the "Customize" button on this screen, although it doesn't make sense to change the URL.
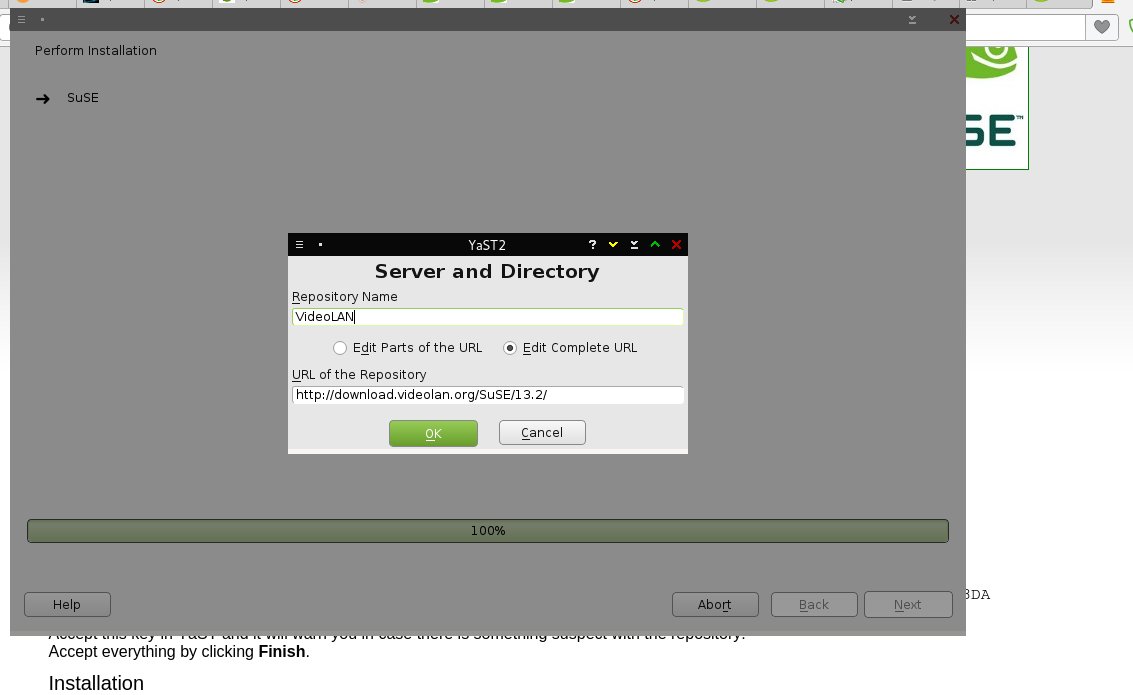
Customizing Repository Name or URL
If the "Customize button is selected on the previous screen, a dialog box will open allowing the entry of a custom repository name. I don't see the purpose of changing the URL.
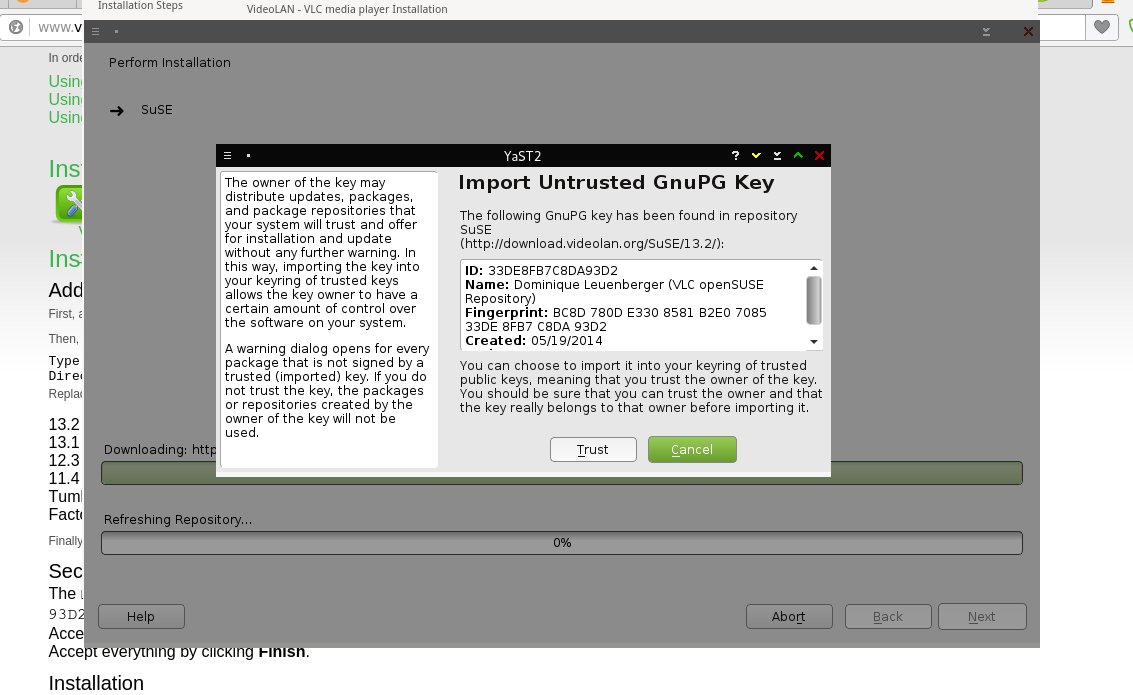
Prompt to Trust GPG Keys Associated with New Repository Added as Part of 1-CLick installation
When this process is complete, looking at the newly installed package in the YaST "Software Management" module, the "Version" tab will show that it is installed from the newly added repository, with no apparent difference in the information displayed from an installation by the 1-CLick Install to a package installed by the usual method.
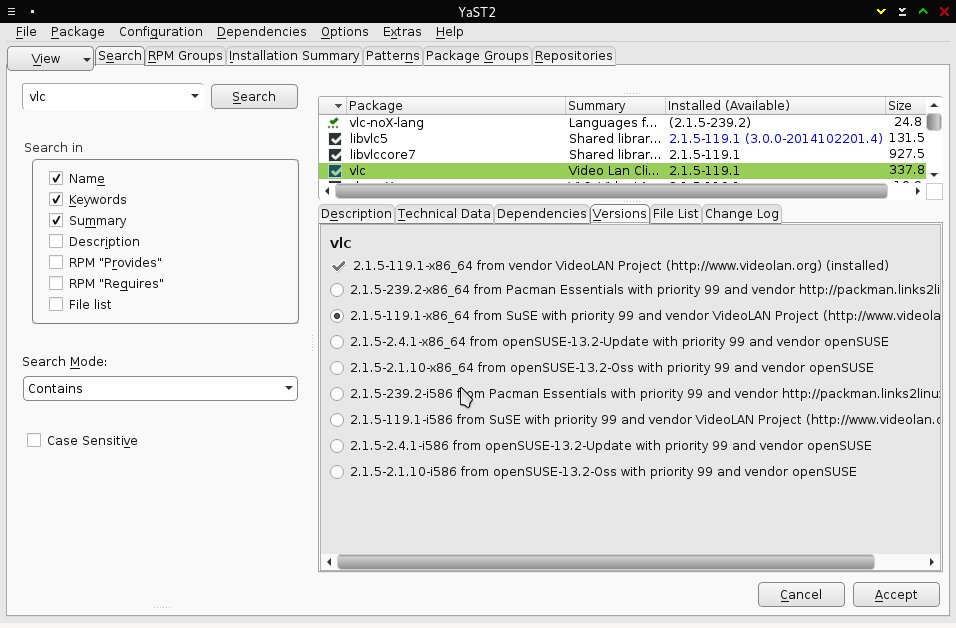
YaST "Software Management" Module Showing Newly Installed Software Using 1-Click Install Button"
The "Versions" tab shows the available versions of VLC Media Player from all repositories. We can see that the 1-CLick installation added the Video Lan repository and installed it from that repository.
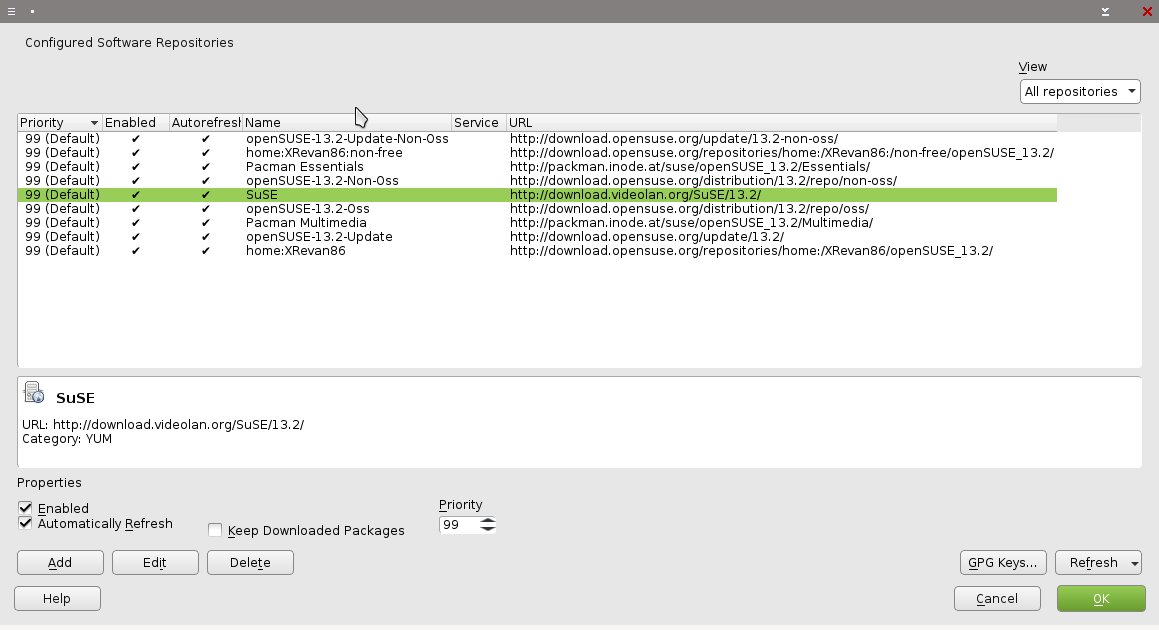
YaST "Software Repositories" Module Showing the Newly Added Repository
The 1-Click install implementation created by VLC names the VLC repository "SuSE", instead of something that would indicate that it is a VLC repository.
The new repository is also seen in the YaST "Software Repositories" module.
Useful Additional Repositories
As mentioned in the review of openSUSE 13.2 the largest issue potential users may have when considering whether to try openSUSE is that, because of the distribution's adherance to OSS software principles, it is not configured to use any proprietary codecs or drivers out-of-the box. Adobe Flash Player is installed automatically as part of post installation updates or if add-on-media is configured during installation, after accepting a license agreement, as a sort of convenience for users, but nothing else is. For access to packages that incorporate or install proprietary codecs and drivers, users need to add repositories to the system configuration using the tools described above.
In the sections below, the most useful third-party repositories that can be added to provide these packages are listed. Other repositories that offer useful, newer, or extra packages are also listed.
PackMan
All users who want a complete user experience should add the PackMan repositories and ensure that any multimedia software or any software that can use proprietary components be installed from the PackMan repositories using the methods mentioned above.
For openSUSE regular releases PackMan provides four repositories:
- Essentials
- http://packman.inode.at/suse/openSUSE_13.2/Essentials/
- provides essential codecs and multimedia software
- Multimedia
- http://packman.inode.at/suse/openSUSE_13.2/Multimedia/
- provides additional multimedia software
- The Essentials repository must be added also to use the Multimedia repository.
- Extra
- The Essentials repository must be added also to use the Extra repository.
- Games
- The Essentials repository must be added also to use the Games repository.
If adding these repositories to any release version other than 13.2, just substitute the actual release version in place of 13.2. For non-regular releases, i.e. Factory, Tumbleweed, and Evergreen, of the grouped sub-repositories, only the Essentials repository is available, although a repsitory (see below) that doesn't subdivide the packages into these groups is available for these non-regular releases also.
The URLs are as follows:
- Factory
- http://packman.inode.at/suse/Factory/Essentials/
- Tumbleweed
- http://packman.inode.at/suse/openSUSE_Tumbleweed/Essentials/
- Evergreen 11.4
- http://packman.inode.at/suse/openSUSE_Evergreen_11.4/Essentials/
- Evergreen 13.1
- http://packman.inode.at/suse/openSUSE_Evergreen_13.1/Essentials/
The URLs for the entire PackMan repository without the grouping of Essentials, Multimedia, Extra, or Games is as above but without the last group specific directory in the URLs. This entire PackMan repository can be used in the non-regular release openSUSE distributions. For example, the URL for Tumbleweed would be:http://packman.inode.at/suse/openSUSE_Tumbleweed/
KDE Extras
The KDE:Extra repository makes available many KDE packages that are not available in the default repositories, such as additional plasmoids, including the very useful weather widgets cwp and yawp, Dolphin plugins, alternative launchers, and various other KDE specific packages. It also offers newer versions of KDE software like the Calligra office suite, and Yaquake than can be found in the default regular release repositories.
The URL is:
http://download.opensuse.org/repositories/KDE:/Extra/openSUSE_13.2/
if you want to add it withzyppergiving it whatever name and alias you want. It can also be added through the YaST "Software Repositories" module either by specifying the URL as described above, or by accessing the list of Community Repositories as shown below.
Opera Browser
I have liked the Opera Browser since my early days with openSUSE/SUSE in the early 2000s becuse it had always worked well on Linux and offered innovations that were eventually copied by other browsers. Now there is a new design of Opera based on Chromium, but unlike those days of openSUSE/SUSE, it is not included in the default repositories. However, an Opera developer has made an OBS repository available at:
http://download.opensuse.org/repositories/home:/ruario:/opera/openSUSE_13.2/
Other OBS Repositories
The OBS repositores provide a good way to enhance the selection of packages available to an openSUSE system by providing some packages that are not available in the default repositories. They can even approach the up-to-dateness of packages in rolling releases for important software like the KDE Plasma environment, for which the necessary URLS were given above. This very minuite my openSUSE 13.2 Plasma 5 desktop is at version 5.2.2 while my Arch installation is at 5.2.1. (The KDE:Frameworks5 repository was updated to include 5.2.2 seven days ago by openSUSE while the Arch repositories were updted to 5.2.2 yesterday, but the changes haven't flowed to mirrors.)
Most of these OBS repository packages can be found using the software portal, where the 1-Click Install will add the repositories necessary. Those that can't be found thought the portal are usually found on third-party websites, like this blog post by an Opera developer.
Conclusion
Hopefully, I have given Linux users interested in openSUSE an idea of how repository management works in openSUSE with some details that may not be found elsewhere. As someone who appreciates openSUSE, I also hope I have given you an idea of the unique and robust features of this distrubution in the area of repository management.